Sprinkler pump makes a clicking noise and turns on and off by itself
A Berkeley multistage irrigation pump started clicking immediately after being turned on at the start of the season and began cycling on and off on its own — a pattern that can damage the motor. After working through the Rain Bird control unit, the intake line, and the pump relay wiring, the fix turned out to be a single loose wire at the relay contactor. No parts replaced. Total cost: $0.
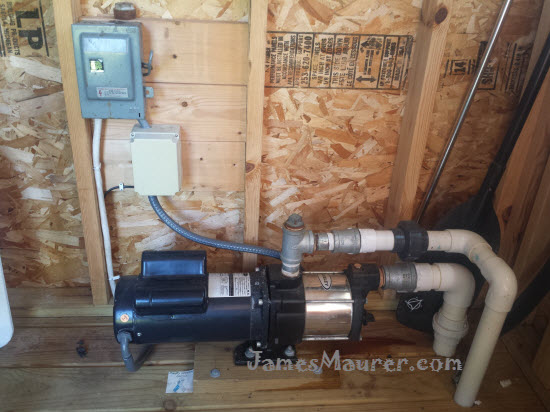
Berkeley model B82456 SSHM-2 — 2HP, 230V multistage irrigation pump drawing from lake water
Root cause & fix — summary
The green signal wire at the pump start relay contactor had vibrated loose from its terminal over years of operation. When loose, it made intermittent contact: the pump started, vibration shook the wire free, the circuit broke, the pump stopped, and the cycle repeated — producing the clicking sound. Re-seating and tightening the wire resolved it completely.
Troubleshooting steps
Steps are documented in the order they were performed. Steps 2 and 3 (intake line) turned out not to be the cause but are included because they are a natural early suspect and worth ruling out.
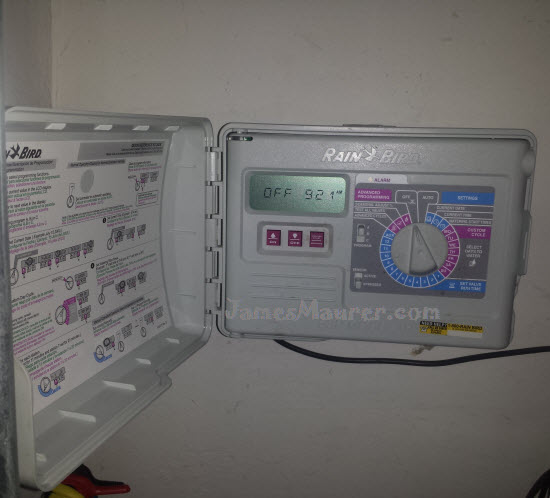
1 Check the sprinkler control unit timer settings
What was checked The Rain Bird control unit was the first suspect — if zone times were set to something very short (like 1 minute), the pump could be cycling on and off rapidly.
Result All zone times were normal at about 20 minutes per zone. The control unit was not the cause.
Rain Bird control unit — zone timers all set correctly, not the cause
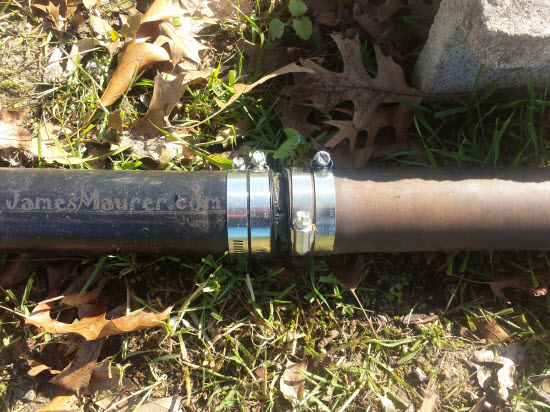
2 Inspect the intake line from the lake
What was checked The intake line draws water from the lake to the pump. During winter removal, the hose was bent and a small leak developed. A leak could starve the pump of water, so this was checked next.
Result A leak was found at a bend in the hose from winter storage damage.
Intake line from the lake — found a leak at a bend from winter storage
3 Patch the intake hose
What was checked The hose was patched with four clamps and a propane torch was used to seal the area around the intake valve. However — this step turned out not to be the cause of the clicking. A leak in the intake line alone does not cause the pump relay to cycle on and off.
Result Leak was sealed. Clicking continued. This eliminated the intake line as the cause of the cycling behavior.
Intake hose patched and sealed — clicking continued, ruling this out
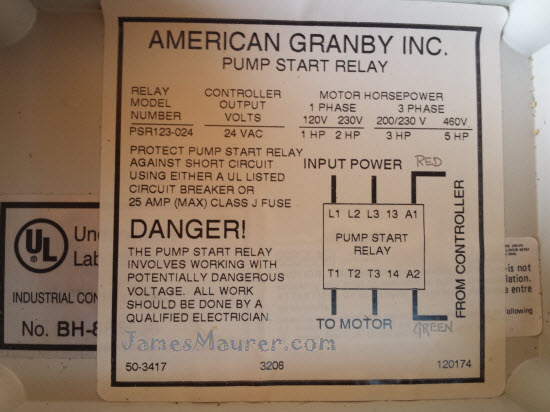
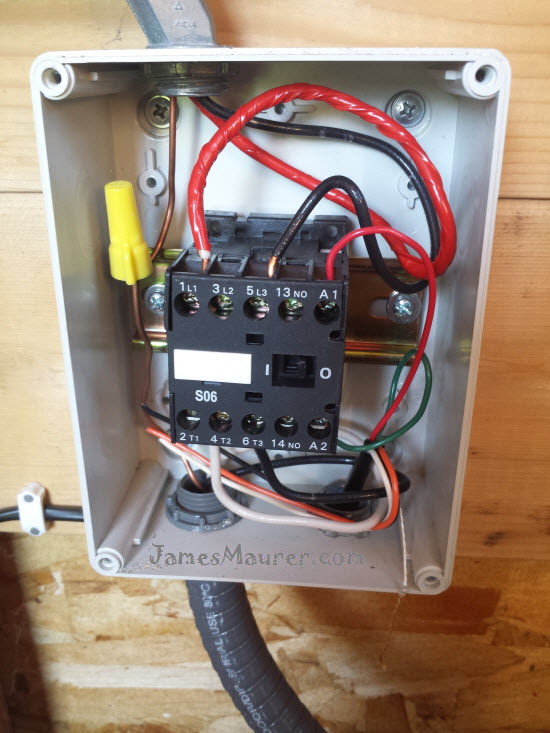
4 Open and inspect the pump start relay
What was checked With all power off at the breaker, the white enclosure housing the pump start relay was opened to inspect the wiring and relay condition. The relay (also called a contactor) is the component that receives the low-voltage signal from the Rain Bird controller and uses it to switch the high-voltage circuit to the pump motor on and off.
Result No visible burning or obvious damage. The relay coil voltage was confirmed as 24V via the tag on the back of the A1 terminal.
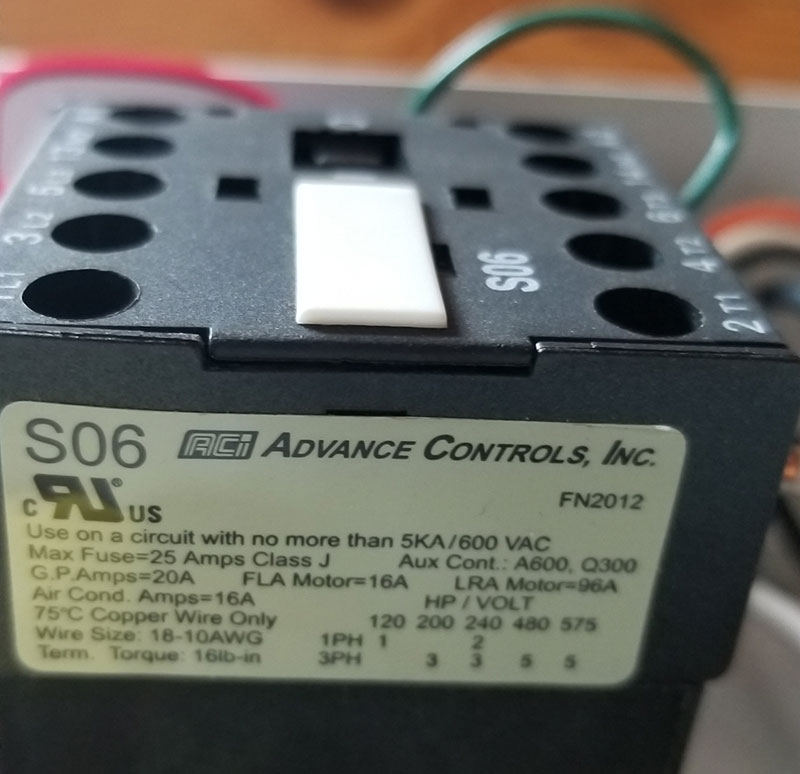
Pump start relay opened — model American Granby PSR123-024, contactor ACI S06 FN2012
5 Identify the relay model and specifications
What was checked The relay enclosure was American Granby model PSR123-024. The contactor inside was labeled: ACI Advance Controls Inc. S06 FN2012. The side label read: Max Fuse 25A Class J, GP Amps 20A FLA, Motor 16A LRA 96A, Air Cond 16A, 75C Copper Wire Only, Wire Size 18–10 AWG.
Result Replacement relay cost was approximately $132. The contactor alone was also noted as a separate replaceable component. This information was gathered but ultimately the relay did not need to be replaced.
Contactor side label — ACI S06 FN2012, 20A GP, 16A motor rating
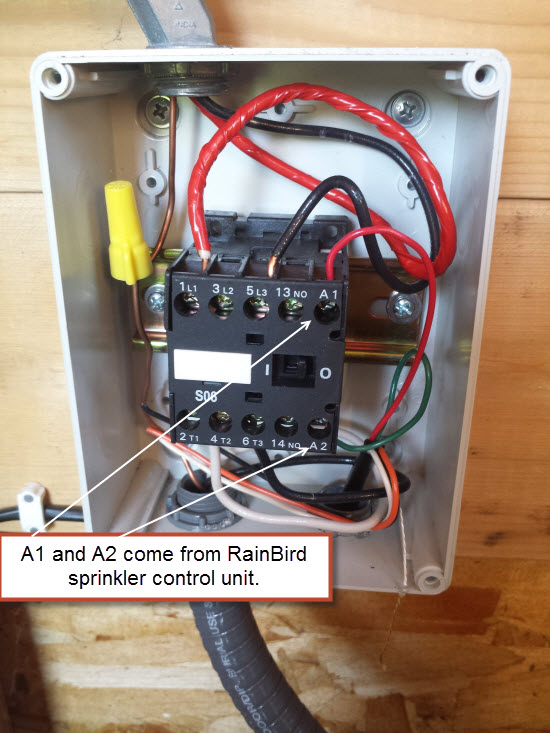
6 Trace the low-voltage wires from the Rain Bird controller
What was checked Looking at the wiring diagram, terminals A1 and A2 on the relay receive the 24V low-voltage signal from the Rain Bird control unit. These are the signal wires — not the high-voltage lines going to the pump motor. The white and orange wires were found sitting close to the ground wire and were repositioned away from it as a precaution.
Result Wiring layout understood. Control signal path from the Rain Bird to the relay coil confirmed.
Relay wiring — A1 and A2 receive 24V signal from the Rain Bird; high-voltage lines go to the pump motor
7 Test the Rain Bird output voltage with a multimeter
What was checked The wires were pulled from terminals A1 and A2 on the relay and a multimeter was used to measure the voltage being sent by the Rain Bird controller.
Result Voltage was a steady 24V. The Rain Bird was sending a clean, stable signal. The control unit was confirmed working and eliminated as a cause.
Multimeter showing steady 24V at A1/A2 — Rain Bird controller confirmed working
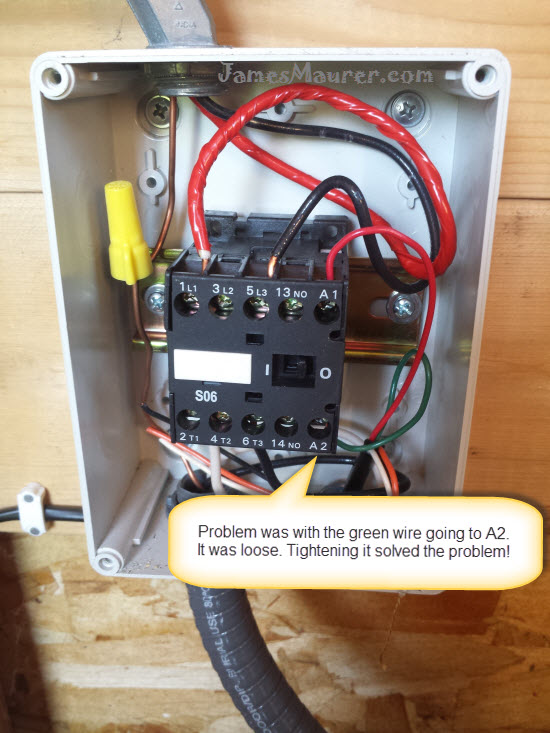
8 Re-seat the loose wire — problem solved
What was checked After reconnecting the A1/A2 wires, each connection was checked for tightness. The small green wire was found to be loose — it had vibrated out of its terminal over years of pump operation. A loose connection at the relay coil causes intermittent contact: the pump starts, vibrates the wire loose, the circuit breaks, the pump stops, and the cycle repeats — producing the clicking sound.
Result The green wire was re-seated and tightened. The pump ran continuously without cycling. No parts were needed. Total cost: $0.
Green wire re-seated and tightened — pump ran normally immediately
Pump relay reference specs
The pump start relay in this system used the following components. Useful for sourcing a replacement if the wire fix does not resolve the problem.
Relay enclosure model
American Granby PSR123-024
Contactor
ACI Advance Controls Inc. S06 FN2012
Coil voltage
24V AC (confirmed via tag on back of A1 terminal)
Max fuse
25A Class J
GP amps
20A FLA
Motor rating
16A LRA, 96A locked rotor
Wire size
18–10 AWG, 75°C copper only
OEM replacement cost
~$132 (not needed in this repair)
Budget alternative
Orbit 57009 sprinkler pump relay — approximately $36
Before buying a replacement relay: check every wire terminal at the relay for tightness. A loose signal wire at A1 or A2 produces identical symptoms to a failed relay — clicking sound and rapid on/off cycling. Retightening takes five minutes and costs nothing.
Questions that come up most
Why does a sprinkler pump click and turn on and off by itself?
The most common cause is a loose wire at the pump start relay (contactor). The pump starts, its vibration shakes the wire loose, the circuit breaks, the pump stops, the wire reconnects, and the cycle repeats. This produces a rapid clicking sound and rapid on/off cycling. Check all terminal connections at the relay before replacing any parts.
Can a leak in the intake line cause the pump to click and cycle on and off?
No. A leak in the intake line may starve the pump of water and cause it to run dry, but it does not cause the relay to click and cycle on and off by itself. The cycling behavior is an electrical issue, not a water supply issue.
What is a pump start relay and what does it do?
A pump start relay (also called a contactor) sits between your sprinkler controller and the pump motor. The controller sends a low-voltage signal (typically 24V) to the relay coil at A1 and A2. The relay uses that signal to close a separate high-voltage circuit that actually powers the pump motor. This protects the controller from handling the high current the motor needs.
How do I check the coil voltage of my pump relay if the label is missing?
Look at the back of the A1 terminal on the contactor. There is typically a white tag printed with the coil voltage rating. In this case it confirmed 24V, which matched the Rain Bird controller output.
What is the Rain Bird pump start relay replacement if I do need one?
The Orbit 57009 sprinkler pump relay is a widely available and significantly less expensive alternative to OEM relays. It was available for around $36 at the time of this repair, compared to $132 for the original American Granby unit.
How do I test whether the sprinkler controller is sending the correct voltage?
Disconnect the wires from the A1 and A2 terminals on the relay. Set a multimeter to AC voltage and measure across the two wires while the system is running. A Rain Bird and most irrigation controllers should read approximately 24V AC. A steady reading confirms the controller is working correctly.
This documents a repair performed on a specific Berkeley B82456 SSHM-2 irrigation pump with an American Granby PSR123-024 relay and a Rain Bird control unit. Pump relay wiring configurations vary by manufacturer and model. Always disconnect power at the breaker before opening any relay or electrical enclosure. If you are unsure of the wiring or voltage involved, consult a licensed electrician.