John Deere L130 belt diagram: deck belt routing
The deck belt on the John Deere L130 can be confusing to re-install — the owner's manual diagram does not accurately match the actual pulley layout on the machine. This page has a photo and routing diagram from a real L130, plus the spring-loaded pulley trick that makes the last step of the install significantly easier.
Deck belt vs. drive belt — which one is this?
Several people ask about the drive belt when they land here. This page covers the deck belt only. Here is the difference:
Belt routing diagram and photo
The diagram below shows the routing path for the 48-inch deck. Click the image for the full-size version. If you have the 42-inch deck, the general sequence is the same but pulley positions vary slightly — verify each position against your own deck.
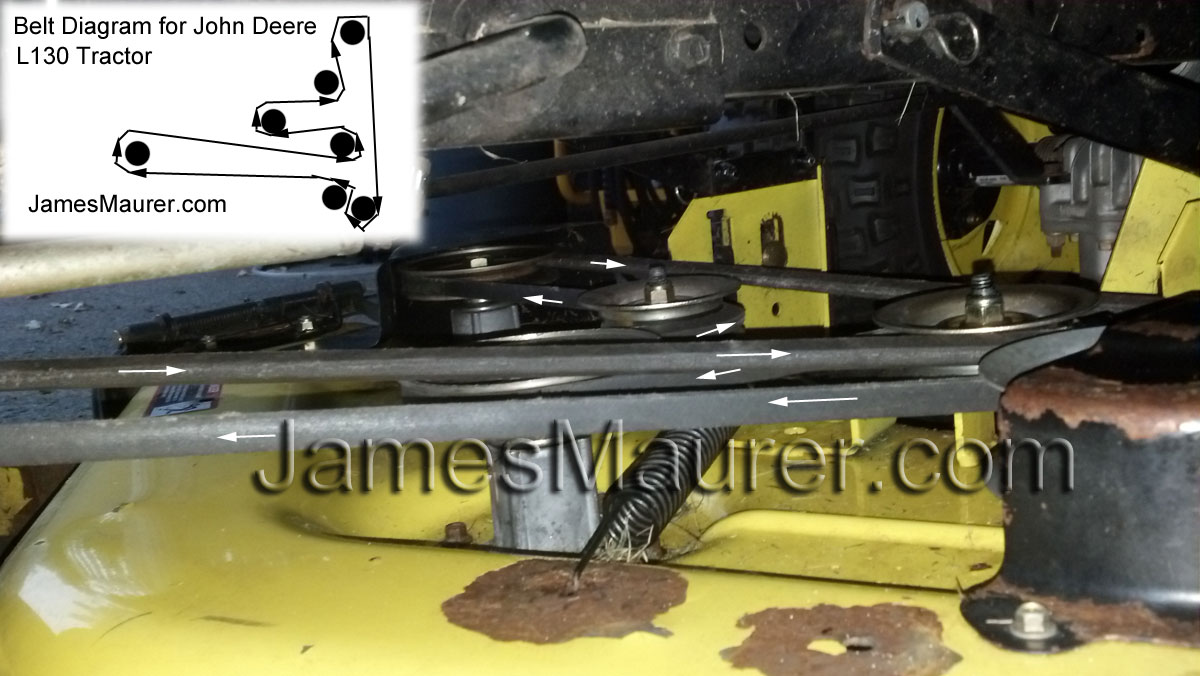
John Deere L130 deck belt routing — 48-inch deck. Click for full size.
Step-by-step routing sequence
Follow these steps in order. Have the deck removed and sitting on flat ground before starting. The last step — seating the belt on the spring-loaded idler — is covered in the tips section below and is much easier with the screwdriver trick.
Start at the PTO clutch pulley at the center of the deck. This is the large pulley that the engine drives.
Route the belt around the left blade spindle pulley, then across to the right blade spindle pulley.
From the right spindle pulley, loop the belt back around the idler pulley. This is the spring-loaded pulley that maintains belt tension.
Return the belt to the PTO clutch pulley to complete the routing loop. Confirm the belt sits in the groove of each pulley and is not riding up on any guard or edge.
- Spin each blade spindle pulley by hand — rough or noisy bearings mean the spindle needs replacement before the belt goes back on.
- Spin the idler pulley by hand — this is the most common reason belts come off. If the bearing feels rough, gritty, or does not spin freely, replace the idler before installing the new belt.
- Check all belt guides are intact and in position. A bent or missing guide is often what allows the belt to jump off under load.
- Confirm the belt is fully seated in the groove of every pulley before lowering the deck back under the mower.
Tips from owners who have done this repair
The idler pulley is spring-loaded. Use a large screwdriver to pry the pulley arm back against the spring while you slip the belt onto the pulley. This makes the last step of the install much easier and also creates enough slack to get the belt seated between the guide bracket and the pulley without forcing it.
If you are replacing the belt because the idler pulley bearings failed, check the routing carefully after the new pulley is in. A seized idler is what throws the belt off in the first place and the routing can shift when the old pulley goes.
If you cannot get the belt past the guard bracket near the spring, try holding the spring-loaded arm back with a screwdriver in one hand and feeding the belt through the gap with the other. The nut on some guards is extremely tight — do not try to force it or you risk rounding it off. Work the belt through the gap instead.
This diagram is for the 48-inch deck. The 42-inch deck routing is slightly different — the pulley positions vary. The general sequence is the same but do not expect an exact match if you have the smaller deck.
Questions that come up most
Is this the deck belt or the drive belt?
This is the deck belt — the belt that drives the cutting blades. It runs entirely under the mower deck between the blade spindle pulleys and the PTO clutch. The drive belt is a separate belt that runs from the engine to the transmission and is not covered here. If your mower moves but the blades do not turn, or if the blades stop when engaged, the deck belt is the one to check.
Why did my belt come off in the first place?
The most common cause is a failed idler pulley bearing. When the bearing seizes or gets rough, the pulley stops spinning freely, the belt slips, and eventually throws off. Mowing through heavy weeds or brush can also knock the belt off by jamming debris between the belt and a pulley. If the belt comes off more than once, inspect the idler pulley bearing before just putting the belt back on.
The John Deere manual shows a different number of pulleys than what I see. Which is correct?
Go by what is physically on your deck. Multiple owners have noted that the L130 manual diagrams do not accurately match the actual pulley count and positions on the machine. Use the diagram and photo here as a reference and cross-check against what you can see on your own deck.
How do I get the belt past the guard bracket near the spring-loaded pulley?
Use a large screwdriver to lever the spring-loaded idler arm back, compressing the spring. This creates slack and opens up the gap between the guide bracket and the pulley enough to feed the belt through without forcing it. Do not try to remove the guard nut — on many machines it is extremely tight and easy to round off.
Does this routing apply to the L120 or other L-series models?
The L130 and L120 share similar deck designs and the routing is largely the same. However, the 42-inch and 48-inch deck configurations differ slightly in pulley position. If you have a 42-inch deck, use this as a guide for the general sequence but verify each pulley position against your own deck before finalizing the install.
Does the belt have a correct direction of travel?
Yes, but the belt is symmetric in appearance, so direction is determined by which side of the pulleys it contacts. Follow the routing in the diagram exactly — the idler pulley is positioned specifically to apply tension on the correct side of the belt loop. Reversing the routing puts tension on the wrong side and will cause the belt to come off under load.
- John Deere mower stalls after warm-up — if the mower runs but stalls after 15–30 minutes, the gas cap vent is usually the cause.
- John Deere won't climb hills — if the mower loses pulling power on hills after warming up, this is a separate hydrostatic transmission issue.
- Sprinkler pump clicking noise — if your irrigation pump clicks and cycles on and off, a loose relay wire is the most common cause.
This diagram and routing sequence is based on a 48-inch deck John Deere L130. The 42-inch deck configuration differs. Pulley positions, guard placements, and belt part numbers vary by model year. Always verify against your specific machine before ordering parts. Disconnect the spark plug wire before working under the deck.