Waverunner loses power and won't go above 35 mph
A Yamaha Waverunner VX1100 Deluxe started sputtering and would not exceed 35 mph. Here is a complete 12-item diagnostic walkthrough with results for each check, the actual cause (clogged fuel injectors), a DIY cleaning method for under $60, and what a shop quoted for the same repair.
Diagnostic checklist - 12 items in order
Each item below was checked on this ski. Results are noted for each. Work through the list in order before assuming the injectors are the cause.
Hold the MPH/VOLT button for 8 seconds to read the stored code. Code 01 means normal operation. A full list of codes is at the bottom of this page.
Check the intake grate on the hull bottom for weeds, rope, or debris. Even a partial obstruction can reduce thrust significantly.
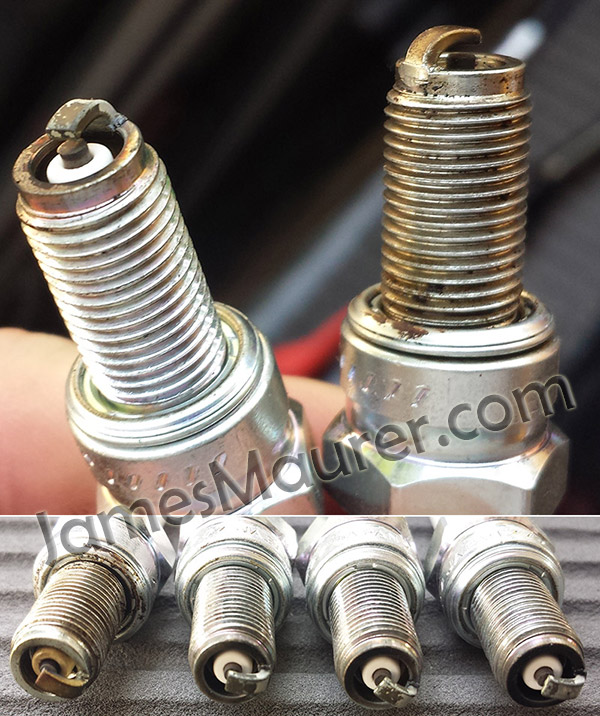
Three of four plugs looked good. One was discolored. Replacing all four plugs did not resolve the 35 mph limit, but the plug inspection is still worth doing - a heavily fouled plug can indicate a richer fuel problem worth tracking down.
L-Mode limits the engine to around 5,000 rpm. If the ski is topping out at 7,000 rpm, L-Mode is not engaged. If the indicator light is burnt out and you suspect L-Mode, a replacement remote from the dealer runs around $130.
Standard batteries can lose connection internally when pounded by waves. An AGM (absorbed glass mat) battery handles vibration much better. If the voltage display is showing low or fluctuating, test the battery before anything else.
Air filters on Yamaha PWCs often clog with oil when the engine is overfilled. The common mistake is checking the oil cold - the reading is inaccurate and leads to overfilling. Run the engine for at least 5 minutes before checking oil level. If overfilled, oil can push into the breather and saturate the air filter.
The wear ring surrounds the impeller and seals against it. If it erodes, water bypasses the impeller and thrust drops. Inspect it visually when the ski is out of the water.
Inspect the impeller blades for nicks, chips, or bending from debris. Even minor blade damage causes significant thrust loss at high speed.
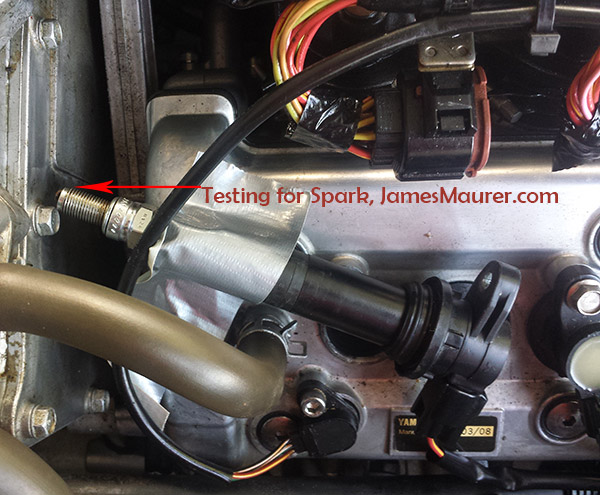
To test, remove the plug, reattach the plug cap, and hold the plug against the engine block while cranking. A spark should jump visibly. Use tape or a dry cloth to hold the plug away from your hand. Do this in a well-ventilated area - fuel vapor in the hull is a real hazard.
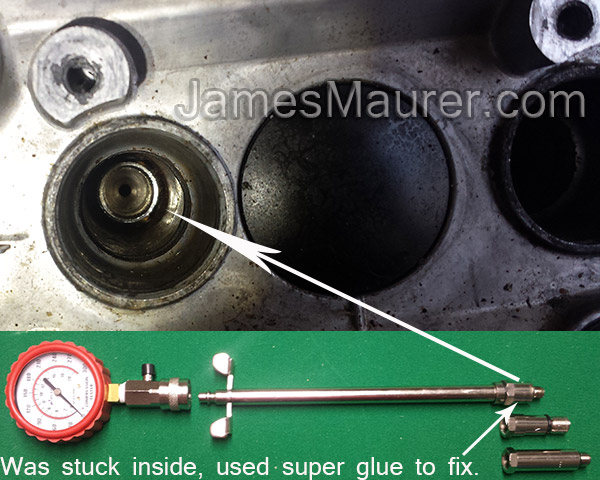
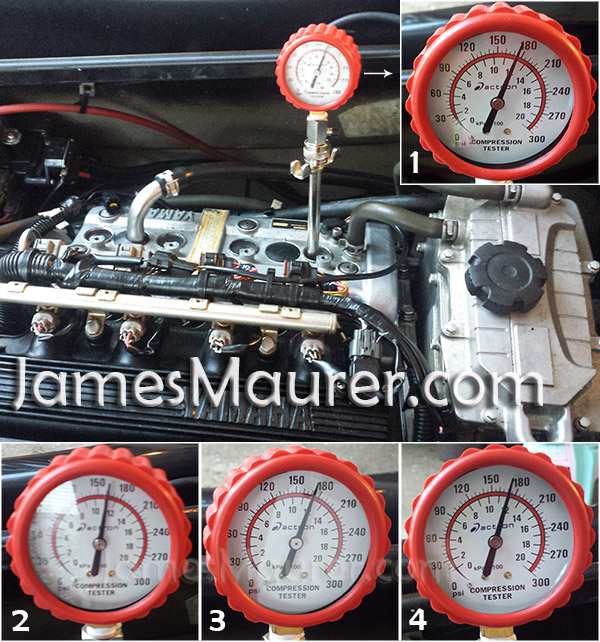
Low compression in one cylinder indicates worn rings, a damaged valve, or a cracked head - expensive repairs. The test itself is straightforward with the right tool. For the 2008 VX1100, the standard cheap compression tester does not fit - the threaded adapter is too large. The correct unit is around $42 at AutoZone.

This was on the suggested checklist but did not appear relevant to the VX1100 configuration. It was noted as a fallback if everything else cleared.
The fuel injectors were clogged. After cleaning all four, the ski returned to full power. A shop does not clean injectors - they replace them. See the DIY cleaning method below.
How to clean the fuel injectors - DIY method
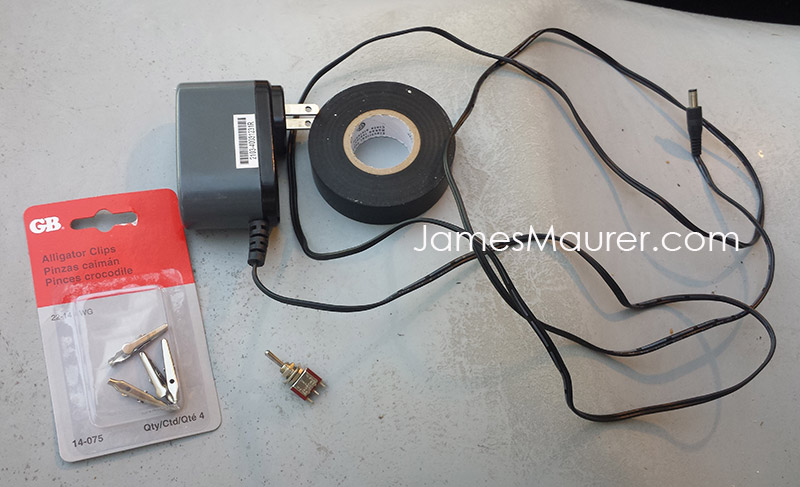
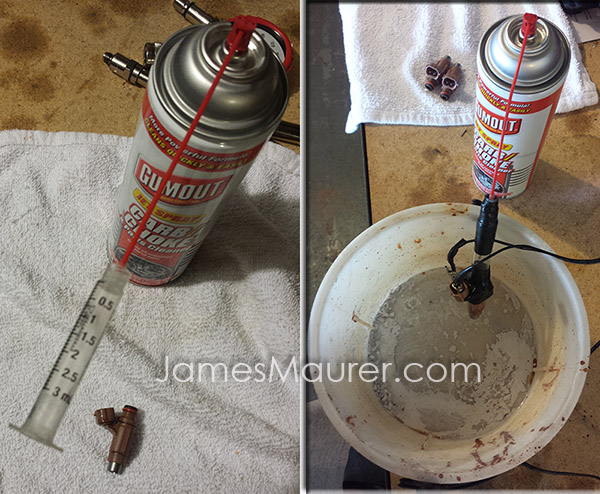
A shop does not clean injectors - they replace all four. The OEM injector is $127 each. The DIY cleaning uses a simple circuit to open the injector solenoid while carb cleaner flushes the nozzle. The device is built from parts that cost a few dollars.
- 6ml syringe - no needle (Tractor Supply, intended for animals)
- 12V DC power adapter - an old router or phone charger works. Keep it under 12V DC
- Alligator clamps (Lowes, Home Depot)
- On/off toggle switch
- Spray can of carb cleaner with straw
- Bucket
- Eye protection
- Black tape
Removing the injectors
Cleaning steps
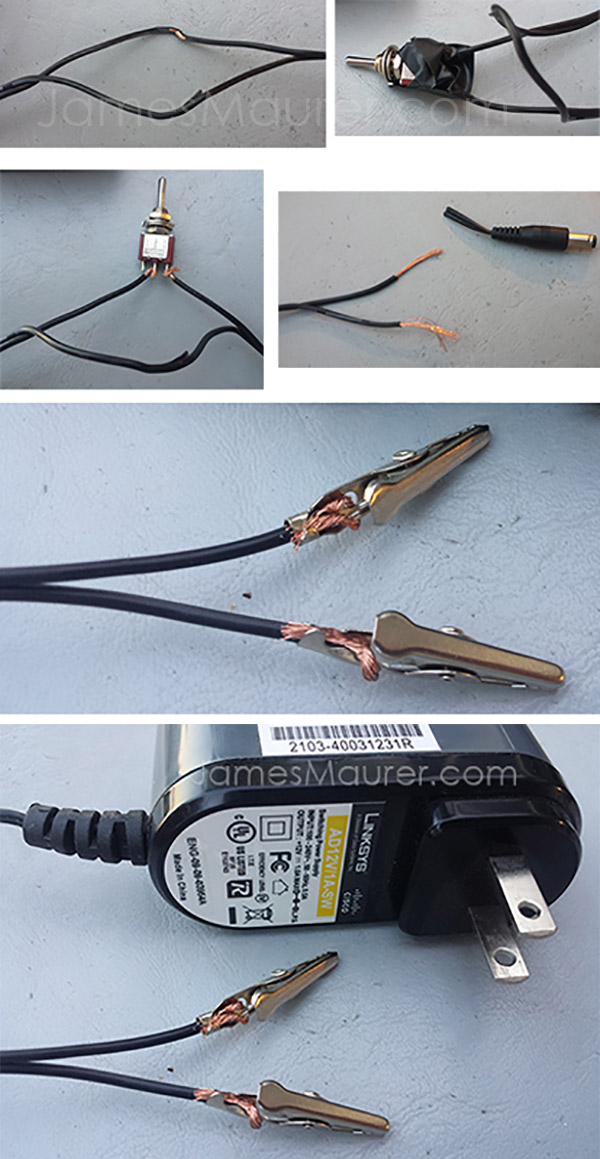
Take the wire from the power adapter and split (not cut) the two conductors apart by about 3 inches. On one of the two conductors, find the center and cut it. Strip the ends and connect them to the toggle switch. Tape any exposed wire ends so they cannot short against each other.
Cut off the plug end of the adapter, strip the two wires, and attach alligator clamps to each. You now have a 12V circuit with an on/off switch that you can clamp onto the injector terminals.
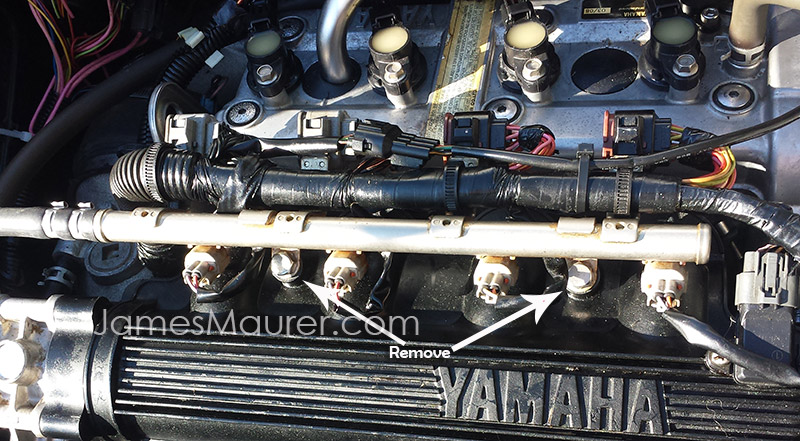
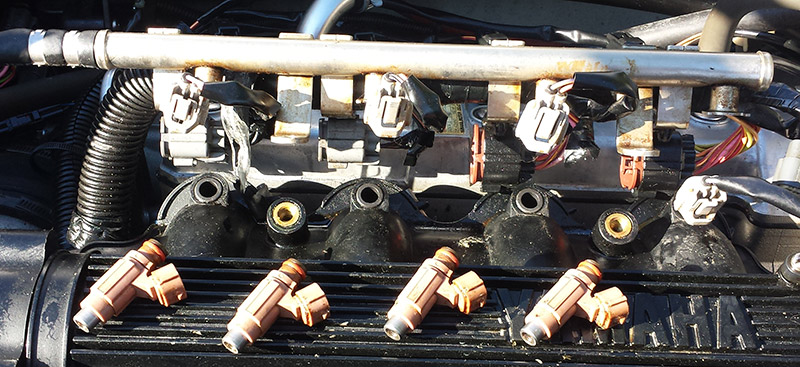
Remove the fuel injectors. Remove the two bolts on the fuel bar. The bar lifts up - rotate it slightly and pull the injectors free. Pinch or clamp the fuel line before removing to prevent fuel from running out continuously.
Insert the o-ring end of the injector (the rubber end) into the syringe tube and tape it in place so it seals.
Attach the carb cleaner straw to the open end of the syringe. Point the nozzle end of the injector into a bucket.
Clamp the alligator clamps onto the two injector terminals. Plug the adapter into the wall.
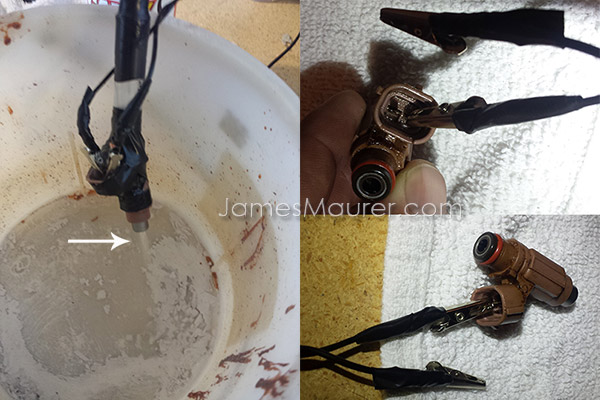
Press the toggle switch to open the injector. While holding it open, press the carb cleaner to push a small amount of cleaner through. You should see a fine mist spray from the four holes at the nozzle end.
A few short bursts is enough. The carb cleaner will eat through the tape after each injector, so remove and re-tape for each one. Repeat for all four injectors.
Shop cost vs DIY cost
A Yamaha dealer was called and described the symptoms. They do not clean injectors - they replace all four. Here is what the shop quoted versus what the DIY approach cost.
Yamaha Waverunner error codes
With the engine running, hold the MPH/VOLT (Select) button for 8 seconds to read the stored code.
| Code | Description |
|---|---|
01 | Normal operation |
13 | Pickup coil malfunction |
15 | Engine temperature sensor malfunction |
19 | Incorrect battery voltage |
23 | Intake air temperature sensor malfunction |
24 | Cam position sensor malfunction |
29 | Intake air pressure sensor malfunction |
47 | Slant detection switch malfunction |
48 | Incorrect data transmission |
49 | EJM depth sensor malfunction |
55 | Steering switch malfunction |
112-123 | Electronic control throttle system malfunction |
124-128 | Throttle position sensor malfunction |
129 | Electronic control throttle system malfunction |
131-135 | Accelerator position sensor malfunction |
136-139 | Electronic control throttle system malfunction |
141-145 | Electronic control throttle system malfunction |
Reader reports
Fuel filter blocked inside the fuel tank was the initial cause - ski would not start. After clearing the filter and servicing the engine, oil was accidentally overfilled (checking oil cold leads to an inaccurate high reading). The excess oil pushed through the breather, the plugs came out dry and black, and the ski would not pass 6,000 rpm or 35 mph. Removing the excess oil and replacing the plugs was the next step. The oil overfilling issue is common on Yamaha PWCs - wait at least 5 minutes of running time before checking the oil level, or you will get a false low reading and overfill. Also: when draining, only about half the oil comes out, so refill only the amount drained plus whatever was short.
One owner reported the ski hitting 50 mph and then repeatedly dropping speed in approximately 30-second cycles. The pattern pointed to injectors partially restricting flow under sustained load. Cleaning the injectors resolved it.
Ski was cleaned and professionally tested. On the next test ride, fuel was dumping from the exhaust with white smoke and the overheat alarm triggered within 5 minutes. This pattern - fuel out the exhaust after injector work - strongly suggests an O-ring failure on reinstallation, allowing fuel to bypass the combustion chamber. If this happens, pull the injectors and inspect all O-rings before running the engine again.
After sitting with old fuel for 3 years, the ski would only reach 4,500 rpm and about 10 mph. Fresh battery and fuel helped it start but not perform. When pulling the injectors to clean, fuel continued flowing from the line. Pinch or clamp the fuel supply line before removing injectors to avoid a large fuel spill.
Engine ran fine for about 10 minutes, then the warning light came on with intermittent horn beeps and the engine dropped to half speed. Error code read 01 (normal). Code 01 does not mean the sensors are all working correctly - it means no fault code is currently stored. A temperature sensor triggering limp mode intermittently may reset the code between readings. If the ski runs normally when cold and consistently limits after warming up, a temperature sensor fault is worth investigating even when the code reads normal.
Questions that come up most
Can I use a fuel injector cleaner additive in the gas instead of cleaning them manually?
It is worth trying as a first step. Lucas fuel injector cleaner is commonly used and may help with minor deposits. It will not resolve a heavily clogged injector the same way a direct cleaning does. If the additive does not improve performance after a full tank, the manual cleaning approach is the next step.
How do I read the error code on a Yamaha Waverunner?
With the engine running, hold the MPH/VOLT button (also described as the Select button on some models) for 8 seconds. The display will show a code. Code 01 means normal operation. A full code list is on this page.
Will fuel keep flowing when I pull the injectors?
Yes. Once the fuel bar is lifted, the fuel line is still pressurized and fuel will flow continuously if the line is open. Pinch or clamp the fuel supply line before removing the injectors to avoid spilling a significant amount of fuel.
What if the compression tester adapter gets stuck in the cylinder?
Apply a small amount of superglue to the thread of the adapter before screwing it into the detachable fitting. Let it cure before testing. This bonds the two pieces together so the assembly comes out as one piece rather than leaving the threaded end inside the cylinder.
The ski still will not pass 35 mph after cleaning the injectors. What else?
Work back through the checklist. Confirm the wear ring is not eroded, the impeller is undamaged, and the air filter is not oil-saturated. Also check that the oil level is correct - an overfill can push oil through the breather and into the intake, causing the same symptom. If all of those are clear, compression testing is the next step.
Are aftermarket fuel injectors a reasonable option?
If replacement is needed rather than cleaning, universal aftermarket injectors are available at a fraction of OEM cost. At the time this was documented, an Accel universal injector was around $83 and a Holley universal around $99, versus $127 per injector for the Yamaha OEM part (60E-13761-10-00). Verify fitment before purchasing.
This documents a specific repair on a 2008 Yamaha VX1100 Deluxe. Part numbers, error codes, and procedures may vary by model year. Verify all part numbers against your specific model before ordering. Work involving fuel systems carries real fire and explosion risk - work in a ventilated area away from ignition sources, and do not leave fuel lines open longer than necessary.